Our blog here will guide through some workable solutions on how to fix error code 0x800f081f on Windows 10, but before we move on let’s have a quick look at a few basic details about it first.
What is Error Code 0x800f081f?
This specific error code is caused by the incompatibilities in Microsoft .NET Framework 3.5 and is similar to error codes 0x800F0906, 0x800F0922, and 0x800F0907. It usually occurs when you use any of the below-mentioned methods to enable .NET Framework on your Windows 10 device.
DISM Tool – Deployment Image Servicing Management ToolInstallation WizardWindows PowerShell Command
Whenever Windows is unable to find the .NET source files and fails to complete the installation process you get an error message. Other error codes that you can encounter are:
0x800F0906: You may encounter this error when your Windows device is unable to connect to the Internet, is unable to download.NET source files, or could not install role service, role, or features.0x800F0922: Your Windows device will show this error message when the generic commands or .NET advanced installer fails to perform.0x800F0907: There are two scenarios in which you will encounter a 0x800F0907 error message when your network settings are preventing your device from connecting to the Web or the DISM tool fails.
Read Also: Best Registry Cleaner for Windows 10
Which Windows Versions Are Prone To Error Code 0x800f081f?
You can encounter this error if you are using any of the following Windows devices. Now that you have a brief understanding of the error 0x800f081f on Windows 10, let’s have a quick look at our troubleshooting guide that will help you resolve it.
How to Fix Error Code 0x800F081F? Simple Fixes And Solutions
Here are a few simple yet effective tips that will help you resolve the error 0x800f081f on your Windows 10 device.
1. Configure Your Group Policy
There are high chances that the Group policy is hampering the installation capabilities of your device. Here’s how you can fix it.
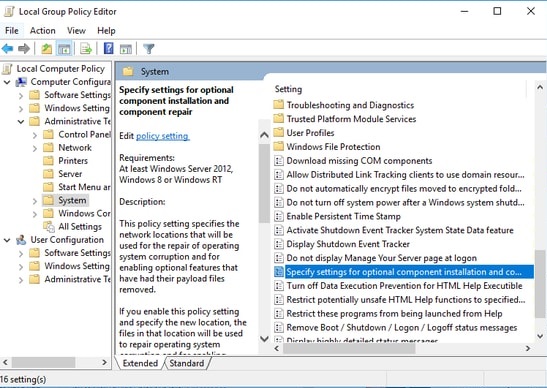
Open the RUN box on your device by clicking on the Windows +R key on your keyboard.In the RUN window type gpedit.msc and press the OK button or hit Enter.The Group Policy Editor Windows will get launched on your device screen.Now from the top let corner navigate to open the Computer Configuration option.From the drop-down list choose Administrative Templates followed by the System tab.Now in the System window refer to the left hand-panel and find the entry saying “Specify settings for optional component installation and component repair”.
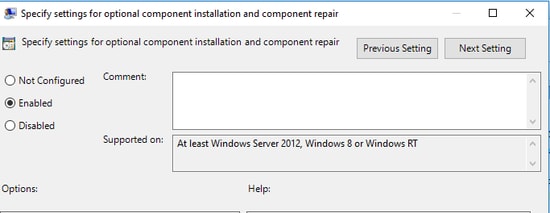
Double click on it.Next checkmark on the Enabled button and press OK.
Read Also: Lightweight Free Antivirus for Windows 10
2. Enable The .NET Framework Using The DISM Command.
Although this method is mainly used to resolve error code 0x800F0922, it can also help you resolve the error code 0x800f081f in most of the cases. Here how you can use the DISM command to fix the problematic areas in your Windows device.
First and foremost ensure that you have an ISO image handy with you of your Windows 10 device, if not you can download it from Microsoft website.Run the tool and select the option saying “Create installation media for another PC”.Now start the creation process by selecting the system architecture, ISO file along with a preferred language.Lastly, burn the ISO file onto a DVD to have an ISO image ready.Once the preliminary requisites are in place, you can move on to fix the error on your deviceMount the newly created ISO image for that, open the File Explorer option on your device, and double click on the file. You can also do it from the Context menu.On successful completion of the process, you will be able to see the ISO in the left-hand panel of your virtual drive.Keep a note of the drive’s letter generated for further reference.Check if the image is mounted properly, if yes click on the Start menu.Type cmd.From the list of displayed results, right-click on the Command Prompt.Next select Run as administrator option.In the next step types Dism /online /enable-feature /featurename:NetFx3 /All /Source:[Drive]:\sources\sxs /LimitAccess on the command line.Now replace the drive with the drive letter you have saved earlier.In the end, press the Enter button.
Read Also: Best Free Computer Cleaner Software for Windows 10, 8, 7
3. Reinstall Microsoft .NET Framework 3.5 On Your Windows
Once you are through with the above-mentioned procedures, install .NET Framework 3.5 on your Windows device to see if the error code 0x800f081f has been resolved or not. To install .NET Framework 3.5 on your device follow the below-mentioned steps.
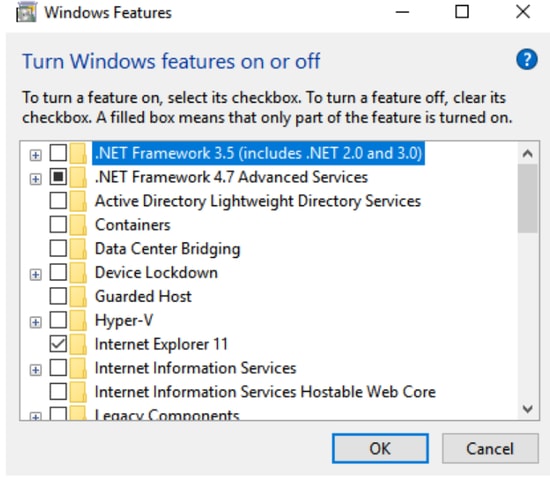
Launch the Settings option and open the Apps tab followed by the Apps and Features option.Next select Related settings option followed by the Programs and Features tab.Now from the upper left corner of the window click on the Turn Windows features on or off.Next tick marks the checkbox adjacent to the .NET Framework 3.5 tab.
Press OK.Wait until the installation process completes.
Read Also: How to Set Free Live Wallpaper on Windows 10
Conclusion: Error 0x800f081f on Windows 10 | Fixed And Resolved
If the installation process is finished in a hassle-free manner, it means that your device is free of any related issues and you have successfully managed to remove error code 0x800f081f from your Windows PC. Lastly, before you leave, don’t forget to subscribe to our newsletter for more troubleshooting tips and tech-related blogs.


