Hide Files and Folders in Windows 10
The simplest way to Hide Files and Folders in Windows 10 is to access File Properties and designate the selected File as being “Hidden” in the Attributes section of the File Properties. This easy method of Hiding Files and Folders in Windows 10 should be good enough for Family Computers where the intention is to prevent kids or anyone else in the family from accidentally deleting or modifying important files and folders. Another method of Hiding Files and Folders in Windows 10 is to make your computer treat your important Files/Folders as System Files, which it automatically hides. The second method requires the use of command prompt to hide/unhide files, which makes it difficult for anyone with average computer skills to snoop on your files.
Hide Single File or Folder in Windows 10
Follow the steps below to hide individual Files and Folders in Windows 10
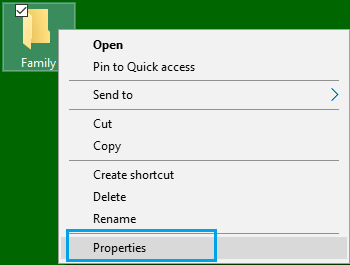
Right-click on the File/Folder that you want to hide and then click on Properties option in the menu that appears.
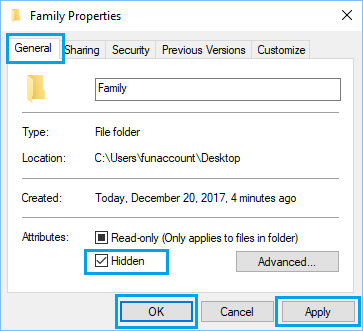
In the File Properties window, scroll down to the “Attributes” section and then check the little box next to Hidden and click on Apply (See image below).
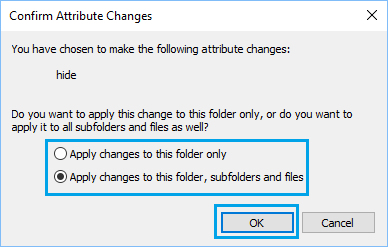
3. On the “Confirm Attribute Changes” pop-up, choose whether you want to “Apply Changes to this Folder only” or “Apply Changes to this Folder, Subfolders and Files” and click on OK (See image below).
Depending on your selection, the selected Folder or the Folder along with all its Subfolders and Files will become hidden, once you click on OK.
Hide Multiple Files and Folders in Windows 10
Follow the steps below to Hide Multiple Files and Folders in Windows 10.
- Right-click on the Windows Start button and then click on File Explorer option in the menu that appears.
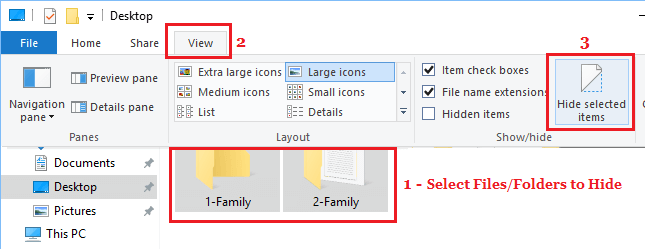
2. In the File Explorer Window, select the Files/Folders that you want to hide, click on the View Tab in the File Explorer top menu bar and then click on Hide selected items option (see image below)
- On the “Confirm Attribute Changes” pop-up that appears, choose whether you want to “Apply Changes to the selected Folder only” or “Apply Changes to selected Folder, Subfolders and Files” and then click on OK (See image below).
Unhide Files and Folders in Windows 10
When Files and Folders are hidden, they no longer appear in File Explorer. However, you can easily Unhide Files and Folders that you had previously hidden on your computer by following the steps below. 1. Click on the Windows Start button and then click on File Explorer option in the menu that appears.
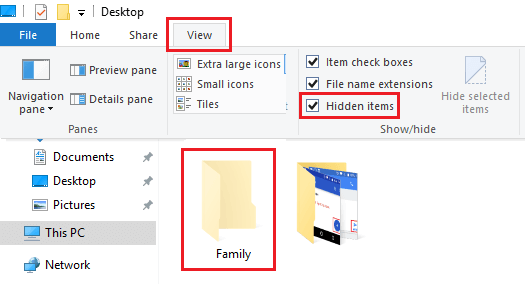
2. In the File Explorer Window, click on the View tab and then check the ‘Hidden items’ option in Show/hide toolbox (See image below).
Checking the Hidden Items option will reveal the Hidden Files/Folders in that location. The hidden Files/Folders will appear with partially transparent icons, so that you can clearly distinguish Hidden Files from regular ones (See above image).
Truly Hide Files and Folders in Windows 10 Using Command Prompt
The methods to Hide Files and Folders in Windows 10 as described above are only good for Home or Family Computers, where no one is really trying to snoop on your files. In order to truly Hide Files and Folders in Windows 10, you can either make use of various Third Party Tools as available in the market or make use of a workaround in Windows 10. The workaround involves making Windows 10 computer to treat the Files/Folders that you want to Hide as System Files. Once this is done, Windows Operating System will Automatically hide these files, just as it hides other System Files.
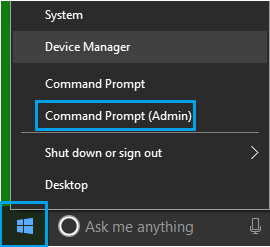
Right-click on Windows Start button and then click on Command Prompt Admin option in the menu that appears.
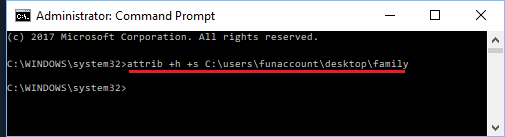
In the command prompt window, type attrib +h +s followed by The File Path and hit the enter key on the keyboard of your computer.
In the above image, a File named as “Family” is located on the desktop and its File Path can be written as C:\users\funaccount\desktop\family. Hence, in the command prompt window, we are typing the attribute command as attrib +h +s c:\users\funaccount\desktop\family. The letters “h” and “s” in the attribute command instruct your computer to treat the selected File/Folder as Hidden and as a System File. 3. Type the Attribute command as required in your case (depending on the location of your File) and hit the Enter Key on the keyboard of your computer Once the command is executed, the File/Folder named in the “Attrib” Command will be treated as a System File by your computer and it will become hidden. Important: Make sure that you note down the file path for the hidden files, you will need this to unhide the file.
Unhide Files and Folders in Windows 10 Using Command Prompt
You can make the Hidden Files visible again by replacing “+” sign with “-” in the “attrib” command and running it again on your computer.
Right-click on Windows Start button and then click on Command Prompt Admin option in the menu that appears.
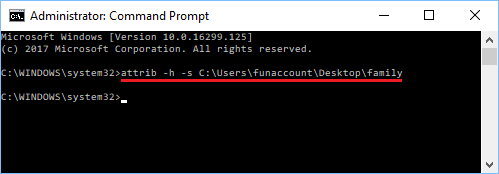
In the command prompt window, type attrib -s -h C:\Users\funaccount\Desktop\Family and hit the Enter Key on the keyboard of your computer.
Once the command is executed, you will see the hidden Files/Folders appearing back on your computer.