The best part about this project is that it practically costs nothing to build this projector and the fun part of it is a bonus! – You will certainly have lots of fun watching videos and pictures with your family and friends once you build this low cost projector.
Things Required
First, you need to make sure that you have the following items and tools at your disposal. This will ensure that you are not running around for things while you are in the middle of building your first phone projector.
Shoebox Knife or cutter Duct tape Magnifying Glass ($1-2) Sharpie or Pen LEGO or Paperclips 10 – 15 minutes of your time
How to Turn Phone into Projector
Once you have got your things and tools ready, you can get started by following the steps below.
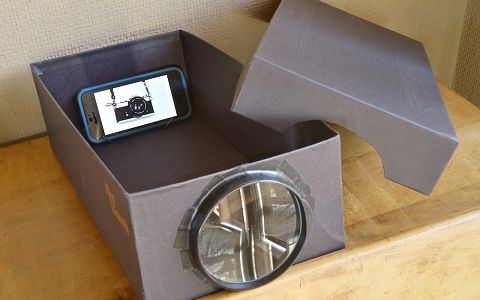
- Trace a Hole: Trace the outer edge of the magnifying glass or lens on the short side of the shoebox using a pen or a pencil.
- Cut out the Hole: Now that you marked the hole in step 1 above, you need to cut out the hole using a knife or a box cutter. Make sure that you are taking all the care and safety precautions while doing this work. Optional: At the back of the box, you can cut out a small hole for your phone’s power cord. So that you can charge the phone without taking it out of the box while you are still using the projector.
- Attach the Magnifying Glass: Attach the magnifying glass either onto the outside or inside of the shoebox. Tape the magnifying glass and make sure that it is held securely and there are no holes from which light can escape.
- Line up the phone and Magnifying Glass: Now line up your phone with the magnifying glass. You need to make sure that the screen of the phone is right in the middle of the magnifying glass. With a sharpie or pen trace two lines all the way to the back of the shoebox. This is where you will be placing the phone within the shoebox.
- Place the phone inside the shoebox: Place your phone on the back of the shoebox, exactly at the place which you had marked in step 4 above. You can place the phone on a stand or If you don’t have a stand you can make one for free using LEGO bricks.
- Stop Rotation: In case you can recall from your physics class – The light gets flipped when it is made to pass through a lens, which means the picture from your phone will be projected upside down. Flipping the phone does not help, as the image flips back to its original orientation. However, there is an easy way out – Android users can simply download the Ultimate Rotation Control app while iOS users need to go into Settings >General > Accessibility and turn on AssistiveTouch. You will see a white orb > Click on the orb and go to Device > Rotate Screen.
- Start Projecting: You can now start projecting images from your phone. If the projector is projecting images upside down, you can just flip your phone and it will project it right side up. In case the steps above were not clear, you can watch this video below from Buzzfeed to get more clarity.
How to Improve Picture Quality
If you want to improve the picture quality follow these tips.
Turn off all the lights. Turn up the brightness to maximum on your phone. Tape inside of the shoebox with a black duct tape.
We hope you enjoyed this article and are looking forward to lots of fun building your first phone projector.
$35 Smartphone Projector Beam: Innovative Smart Projector