Talking about Microsoft’s product line, a Surface keyboard is one of the best devices and is quite popular among all PC users. Irrespective of being a sophisticated device, many users are lately reported that their Surface keyboards are not working properly, and sometimes the Keyboard is not responding at all. This is a really frustrating issue, and figuring out how to fix this inconvenience can be just as frustrating or tiring. But, you don’t need to worry about it, as we can help! There are numerous ways that can assist you to overcome this issue. In this write-up, we have listed the best practices and tried to teach you how to fix Surface Keyboard not working on Windows 10, 8, 7 PC hassle-free. And, if you want to know about the other solutions then read further. Don’t have enough time to read the entire guide? Not to worry, just keep your keyboard drivers in good working condition. And, to do so quite easily & quickly, download Bit Driver Updater from the button below to automatically update the keyboard drivers. This driver updater utility automatically recognizes your device and installs the correct drivers for you. Along with this, the software is highly capable of increasing the overall performance of your PC.
How to Fix Surface Keyboard Not Working on Windows 10, 8, 7
We have listed down a few easy workarounds to fix Surface keyboard not working issues on Windows 10, 8, 7 PC. Go through each method and choose the best one that works for you.
Solution 1: Restart your Surface
If your Surface keyboard does not work or has become completely unresponsive then first and foremost, you should try to reboot your Surface keyboard. Follow the steps shared below to do so: Step 1: First of all, disconnect your respective Keyboard. Step 2: Then, start your Surface again. Step 3: Now, try to connect your Keyboard again. Once done, restart your computer and check if the Surface keyboard not working has been fixed. If not, then move on to another solution. Also Read: How to Fix Laptop Keyboard Not Working on Windows 10
Solution 2: Run Two Button Shutdown
The Surface keyboard abruptly stops working properly, when the issues of your tablet hardware conflict with your preferred keyboard. If that’s the case, then rebooting the Surface isn’t enough to make it work again. For this, you should try to run two or force button shutdown in order to power off your tablet completely. But do keep in mind that you can run a two-button shutdown only when you are accessing a Surface Book and Surface Pro. Follow the instructions shared with you below to perform a two-button shutdown: Step 1: On the side of your device, press the Power Supply button and hold for around 30 seconds. Step 2: Then, release the button. Step 3: Now, altogether press the Power Supply button and the Volume Rocker-up button and hold the buttons for around 20 seconds. Then, release them. Step 4: After this, you need to wait for about 15 seconds. Step 5: Later, turn your Surface on. Hopefully, this solution should work for you. But, in case, if not, then try the other advanced solutions mentioned below.
Solution 3: Perform Windows Update
An outdated version of Windows operating may also cause Surface keyboard not working issue. Hence, always make sure to run Windows Update from time to time so that the latest version of updates and patches can make your system much smoother. Here is how to do that: Step 1: Altogether press the Windows logo + I keyboard buttons, to launch Windows Settings. Step 2: Then, navigate to the Update & Security button and click on it. Step 3: In the subsequent window, select Windows Update from the left pane and then click on the Check For Updates option from the right pane. That’s it! Now, let Windows search for the available updates. If Windows finds any update if available, then it will download the update on its own. Try this to check whether updating the Windows version works for you or not. Also Read: Download and Update HID Keyboard Device Driver For Windows 10/8/7
Solution 4: Update your Keyboard Driver
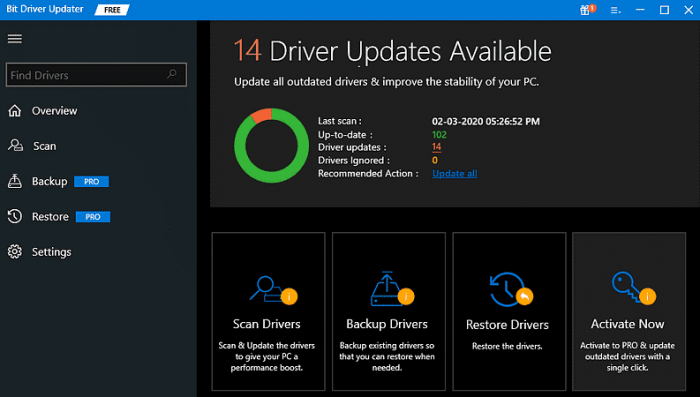
If your Surface keyboard fails to function properly then, it could happen due to the outdated, broken, or faulty keyboard driver. Hence, you should keep your keyboard drivers always in tip-top condition by updating them frequently. The user can either update drivers manually or automatically. Although, the manual method requires a good amount of technical knowledge as well as enough time. Here comes, Bit Driver Updater as a savior. It is the best driver updater utility that can automatically update all outdated, broken, or missing drivers within just a few clicks of the mouse. Also, the software possesses some rich features including scan scheduling, one-click driver update, 24/7 technical support, automatic updates, backup & restore tools, or whatnot. Follow the steps listed below to update your keyboard drivers via Bit Driver Updater: Step 1: Make a click on the button below to download the step-up file of Bit Driver Updater.
Step 2: After this, run the setup file by double-clicking on it and then follow the on-screen instructions to get the driver updater installed on your computer. Step 3: Launch the software and let it scan your PC for broken, outdated, or faulty drivers. A Point to Remember: The user can also perform scanning manually, for this, just click on the Scan button from the left instead.
Step 4: Thereafter, review the scan result and click the Update Now button presented next to the driver you wish to update. Step 5: Alternatively, you may also click on the Update All button to update all drivers in one click.
So, there were some simple steps one needs to follow in order to automatically update outdated drivers through a one-stop-shop Bit Driver Updater. Along with updating the drivers, the Bit Driver Updater also offers numerous fixes to resolve the issues related to Windows such as Blue Screen of Death errors, old security patches, slow PC performance, etc.
Solution 5: Reinstall your Keyboard Driver
Unfortunately, if updating the keyboard drivers doesn’t work in your case, then try to reinstall the respective drivers. However, for reinstalling the drivers you need to first uninstall the currently installed drivers from your PC. Below are the steps you need to follow: Step 1: Simultaneously, press the Windows logo + X keyboard buttons then locate Device Manager and click on it.
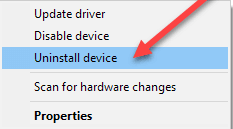
Step 2: Once Device Manager opened, then expand the category of Keyboards and click right on the Surface Type Cover device. Step 3: After this, choose Uninstall Device from the context menu access list.
Step 4: Click yes if an uninstallation window prompts. Once done, then reboot your Surface in order to permit Windows 10 operating system to reinstall the Surface keyboard driver. Also Read: Lenovo Drivers Download and Update For Windows 10, 8, 7
Solution 6: Try to Reset your Surface
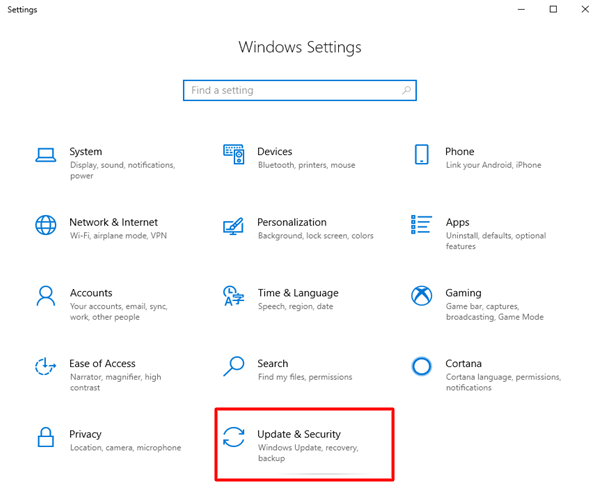
If in case, none of the above-mentioned solutions worked for you, then don’t panic and try to reset your Surface. There may be some corrupted or missing files that cause the Surface keyboard not working issue. Hence, to repair all the faulty files you need to reset your Surface. And, one can do so with the simple steps shared below: Step 1: Go to the Windows Settings by pressing Windows Logo + I keyboard buttons at the same time. Step 2: Now, choose the Update & Security option.
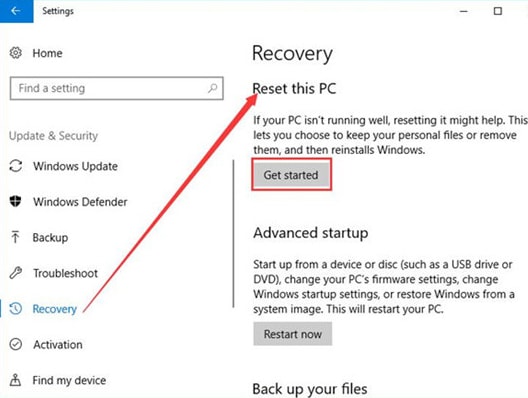
Step 3: After this, on the left, scroll down to choose Recovery. Step 4: Then, click on Get Started under Reset this PC from the right pane.
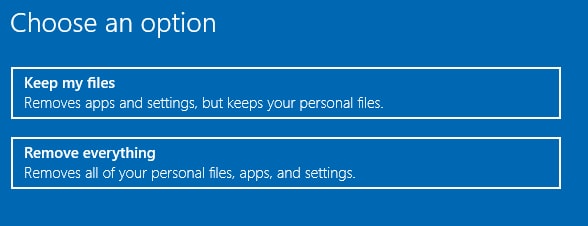
Step 5: Next, select an option, either Keep my Files or Remove Everything.
Step 6: Thereafter, comply with the onscreen instructions to complete resetting the PC. Once you are done, then check to see if you can use the Surface Keyboard again. Hopefully, resetting the Surface should help you make your respective keyboard work again. Also Read: [Fixed] Lenovo Laptop Keyboard Not Working Issue In Windows 10
Surface Keyboard Not Working on Windows 10, 8, 7: FIXED
Thus, you can make your Surface keyboard function again. We hope the aforementioned solutions help you fix Surface keyboard not working issue. Do let us know in the comments which solution worked for you. Also, drop us a comment below if you have any suggestions or further questions. Lastly, before you go, do subscribe to our Newsletter to read more troubleshooting guides just like this one. Additionally, follow us on our Social Handles: Instagram, Facebook, Twitter, and Pinterest for quicker tech-related updates.



![]()
